I have been reprocessing some older multiple exposure montages using new techniques.
This is one was shot in October 2019 during the Toronto Waterfront Marathon using my iPhone’s burst mode and can be found on Rarible as an NFT.
Front Running Marathoners – a multiple exposure montage
The technique is pretty simple:
Shoot trying to visualize your point of interest with enough room for cropping.
Load into Photoshop as layers. I use Lightroom for this;
To create the multiple exposure effect you have to change the opacity. Start with the base layer at 100% and ever layer after that reduced by about 50% until you get to around 5%. Once you have a sense of the resulting image play with the opacity until you are happy with the resulting impressionistic image.
Colour correct. I think setting your black point and white point is most important as there are colour shifts. I also use NIK’s tools.
Here is a short video to give you an idea of that I do. Feel free to reach out on instagram/sjdagostino_photoimpressionism
I am just back from a 2 week recharge in St Lucia and used the break to experiment with wave time stacks. If you follow The Photo Impressionism Project you will be familiar with Matt Molloy’s fabulous cloud time stacks. Basically the technique relies on a time lapse series that is then brought together using Photoshop’s lighten mode opacity blend to create a sense of movement.
I have adapted Molly’s technique to faster moving subjects using high speed shutter bursts. In this case 10 images of a breaking wave shot at 60 fps using Nikon’s N1 V3. The image then has to be colour balanced using the usual tools. I tend to rely on the white\black point method and NIK’s contrast filter.
I really like the feeling of the curl here and the pallet knife textures produced by the time stack. If I had just used an opacity blend the image would have been pleasing but much softer.
It isn’t often that you read a blog post that changes your approach to things that matter. Adam Portilla’s post describing how to auto import your iPhone photostream into Lightroom is one of those exceptions. Its easy to follow and it works for me.
Check out his technique on Google+. It has made a big difference to my approach to photo impressionism on the iphone because my images can be archived my way.
Photo impressionism has been a big part of my photographic vision for a long time now. However, exposure to Pep Ventosa’s “in the round” work in 2012 turned my photo impressionism paradigm on its head. Up to that point I had been working with images moving in the frame using slow shutter or multiple exposure techniques. It had never occurred to me that the frame might move too. Moving the frame around the subject is the essence of in the round photography.
The beach umbrella above is composed of about 30 images methodically taken around it. My camera is handheld with the relative location of the point of interest maintained in the viewfinder. The images are then brought together using an opacity blend. In my workflow I start in Lightroom. I open all the images at once, as layers, and then start the process of opacity blending.
The video above gives a sense of the process I used to create the beach umbrella. What I find interesting is how details fall away leaving blocks of colour and a generalized impression of the subject.
Two important decisions play a big part in the creation of a successful in the round image.
The first is the subject; the basic shape has to be interesting enough to withstand being deconstructed. Opacity blending creates what is really an average of the shape from many points of view. I think of the process as “image averaging.”
The second decision is how you treat opacity blending. By that I mean the opacity mode and/or the amount of opacity of the various layers. In the Washington Square image I wanted to compress the activity around the fountain to capture the excitement of place. The beach umbrella was more of an exercise in shape and colour.
It was Pep Ventosa’s trees that originally caught my imagination. Having worked with trees as a subject I think I understand why. For me trees symbolize the strength and vitality of the natural world. Image averaging seems to emphasize those qualities. Tree trunks seem to reach higher. The branches and crown are fuller and rounder.
The resulting textures are interesting too. By layering the leaves the viewer is left with the impression of a pointillist painting in a landscape reduced to basic shapes and colours.
This is a technique that is not camera dependant. I have had good luck using a DSLR, mirrorless camera and an iphone. The key is being able to hold a relative point in the viewfinder; grid lines really help.
Post production is the key. I open the images as layers in Photoshop and then start to blend the opacity. If you are blending manually start by reducing opacity by 50% of the preceding image until you get to about 5%; experiment from there. The process is very processor intensive and file sizes are huge so be prepared to wait.
I also use a couple of plugins to automate the process where appropriate:
Layer Stack Opacity Blending: a script that evenly blends opacity in a way that mimics in camera multiple exposure. Thanks to Digital Outback Photo for maintaining the script. I often use this script to test an image idea before manually setting the opacity.
Dr Brown’s Stack-A-Matic: a good alternative to opening images as layers in Photoshop. Dr Browns site is worth exploring. There is a wealth of information on photoshop technique. Or check out Dr. Russell Brown Services on Adobe Exchange.
Mike Hale’s Stack Mode Panels: a great tool for adjusting the opacity mode. I find it a real time saver when experimenting.
There are so many distractions from actually taking photographs it is amazing that we ever have time to create. Learning the nuances of new equipment and what has really changed in the constant flow of software updates can be a career in itself. My mission has been to simplify my life to make more time for things that matter; starting with this website.
I have exhibited on the web since 2001. Originally using Microsoft’s web development tools and then Adobe Dreamweaver I was able to produce a good basic exhibition platform. The cost however has been time spent constantly learning and development time; time better spent with a camera in my hand or discovering better post production technique.
For me the obvious answer is to embrace someone else’s code and use an existing content management system (ie a blog.) I chose WordPress because it is widely supported, and is powerful enough to do everything I need in a photography website.
I discovered two things in my transition to WordPress. The first, that Yahoo, my host since the beginning only provided partial support for the WordPress tools on my shopping list. In other words the choice of a host matters. I eventually chose DreamHost. Second, there is an online web development company (Elto.com) that specializes in WordPress at a price that makes it silly to invest your own time to learn how to do it yourself.
Elto breaks the steps down into understandable tweaks for pricing and project management purposes. In my case they customized an existing WordPress theme to give me more control over menuing, migrated my site to a new host including the DNS transfer and finally set up the 301 and 404 page redirects to account for the new page locations; all for under $300. I can report that it was absolutely painless and the results here are proof it works.
So here is a shout out and thanks to my project manager Luke Pickett and everyone at Elto.
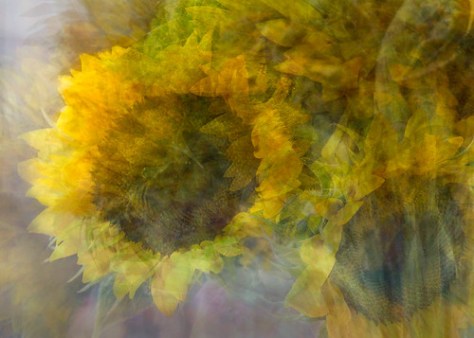
“In the round” has been a focus of my recent photo impressionist work. I have experimented with outdoor subjects such as trees, fountains, even carousels. Subjects that have a symmetrical shape seem to work best because the technique deconstructs the subject by averaging the pixels in the underlying photographs and isolates it in the context of a textured background that hints at the subject’s context. The images tend to be painterly; sometimes surreal; always interesting. I’m hooked, but on a rainy day, what to do but try some still life.
The sunflower image above is composed of about 40 photographs. I spent considerable time reordering the base images ( Photoshop layers) in order to produce the impressionistic effect. I like the feel here. The detail in the flowers produces a lot of visual interest. The vase also generalized well. But the stems seem too thin and a bit out of balance for my liking.
When I come to print this one. I think I might try cropping it in portrait format to better balance the flowers, vase and stems.
That’s when it struck me. The strength of this image may be in its parts rather than the whole.
Finding the picture in the picture (sometimes called image harvesting) isn’t new. Think about it. When you look through the viewfinder you are selectively cropping the image. Why not do the same thing post production? Provided the original shot has enough pixels to allow for it, selective cropping gives you another opportunity to produce your vision.
Once you have selected the cropped image, consider going back and rebalancing the post production adjustments to strengthen the image. Think of using a zone approach where the textured whites draw your eye and the blacks give it rest.
I really like Detail 2. Visually it takes me back to my first multiple exposure impressionistic images. However, because the images were shot in the round, the underlying pattern is much more interesting. And it has been well received. The image was featured on Flickr’s explore page. At the time of writing Sunflowers In The Round: Detail 2 had about 7,000 views on Flickr.
Red Rocket – a long exposure photo impressionistic iphone image by stephen d’agostino
Or “What’s in my camera bag phone”
I have been thinking about technology and how it shapes art since writing about an exhibition of early photographs and impressionist paintings at the University of Michigan’s Museum of Art. The exhibition argues that some impressionist painters were influenced by photography. The influence of technology on photography is not a new idea. “What’s in my camera bag” is a staple subject for photographers. But it is more relevant in the age of iphoneography and the rise of impressionistic photographs.
Look up – a photo impressionistic iphone image by stephen d’agostino
A Brief Chronology:
1860-1900 – Start with the impressionist painters . While they may have been influenced by contemporary photography, the more important factor was the invention of the paint tube. Before the paint tube painters were essentially studio bound. Painting en plein air required tremendous effort and significant resources. Of course it could be done. But the effort stifled experimentation and creativity.
Tube paint gave painters the technical ability to paint when and where the moment moved them and more importantly the ability to experiment with little risk. The resulting genre produced images that were immediate, fresh and impressionistic.
1885-1915 – Move to photography at about the same time. In its infancy photography also required a huge effort to be portable. Yes it could be done. Glass plates and chemistry could be carted to an appropriate vista. But the rise of the first photo impressionists, the Pictorialists, coincided with the arrival of practical gelatin process films and the introduction of the first Kodak in 1889. Portability allowed for experimentation without a huge investment but the final print often relied on darkroom manipulation and skill.
Rain – a slow exposure photo impressionistic iphone image by stephen d’agostino
2001 – Then we have the modern photo impressionists such as Freeman Patterson. His book Photo Impressionism And the Subjective Image, published in 2001 inspired a generation of film shooters to experiment with the genre. But in 2001 experimentation was handicapped by the delay inherent in film. Images had to be processed meaning that the artist couldn’t know whether they had captured their vision for hours or days. The final image required printing.
There was also a fair amount of technique involved. Multiple exposures required a mathematical calculation to predetermine exposure. Long shutter photography relied on filters to neutralize colour shift. Darkroom wizardry was often used but wasn’t required. As a result, a successful image relied more on planning than spontaneity or just a lucky break.
2002 – While the first consumer digital SLR camera came to market before the publication of Photo Impressionism And the Subjective Image, they were not widely available until a few years after that. Digital capture was to photo impressionism what tube paint was to the impressionists.
Digital photography meant immediate artistic gratification at no cost per image thereby facilitating endless experimentation and immediate feedback. Printing could be bypassed altogether. Looking back we see a rebirth of photo impressionism in the second half of the last decade.
The advance in digital camera features often meant techniques like in camera multiple exposures could be achieved without any skill (just compose and click) further enabling the genre. But still photo impressionism was not fully democratized until the iPhone’s first release in 2007.
Slow – a long exposure photo impressionistic iphone image by stephen d’agostino
2007 – The cameraphone/smartphone is the swiss army knife of digital devices and in many ways perfect for impressionistic photography. They are widely available and often affordable to own. They are exceptionally portable and as a result are always with you. Smartphones often have built in filters and features to assist in taking photo impressionistic images. The technology assumes that images will not be printed making sharing easier on a variety of platforms. Inexpensive apps are available to further the creative process. It is noteworthy that recently Apple and others have focussed on the camera as an important part of the smartphone mix.
Smartphone photography has taken off; the iphone is now the most popular camera on Flickr. Not surprisingly the mix of widespread accessibility, the availability of creative apps and immediate artistic gratification at no cost per image has allowed more photographers and now non-photographers to push the bounds of creativity on their phones.
The popularity of photo impressionism has followed the iPhone’s success. Consider the tiny collective as an example; a site dedicated to smart phone photography. By my count 20% of the images posted are wonderful examples of photo impressionism.
tools I use for photo impressionism projects on my iphone.
What’s In My Smartphone:
I was a late convert to iphoneography. For me the camera on my phone was a note taking device; really not worthy of consideration as an artistic tool. It wasn’t until I started to play with apps such as Slow Shutter Cam and Snapseed that I started to understand the creative potential of smartphones. All the image in this post were taken with an iPhone 4s.
Here is my app list (the digital equivalent of a camera bag):
Slow Shutter Cam – this is the app that started it for me. The app has a good suite of features including the ability to control shutter speeds from 0.5 to 15 seconds with automatic exposure control. The app would benefit from grid lines to help with composition.
InstaBlend – think of layer blending in Photoshop, a technique I rely on for my “in the round” images. The interface is a bit clunky but it gets the job done. I am experimenting with “in the round” using this app and will post my results shortly.
Marksta – I get that the www is the wild west of rights management but if you are proud of an image you should show you own it. This is a great and easy to use copyright watermarking tool.
Snapseed – originally a NIK Software picture editing tool. Google now owns it and is embracing it in the mobile market. It is intuitive to use and feature rich. I prefer Photoshop Express but I can’t articulate why.
Photoshop Express – An Adobe picture editing tool. It is intuitive to use and feature rich. This is my go to app for on phone editing.
Flickr – I use Flickr as my test bed for new projects. The Flickr community is fully engaged in photo impressionistic endeavours. I prefer the mobile site to the app.
Instagram – Another great test bed for my projects. The app is the entry point if you want to use the service. The app has some tools but they are pretty basic.
PortfolioToGo – the app is no longer available for download but I still use to show my portfolio on my phone.
Final Impressions:
Iphoneography is a natural tool for photo impressionistic expression. Portable with a rich set of features and instant feedback it expands not only the photographer’s possibilities, but also increase the pool of potential photographers entering the genre.
I think of my iPhone as a sketch pad. From my perspective it excels at images that are immediate, fresh and impressionistic. My phone is not going to replace my cameras for major projects. Photoshop Express and Snapseed are not going to displace my use of Photoshop. However like tube paint for the impressionist painters iphoneography makes it all the easier for me to explore my vision when and where I want. And that is a big step in the right direction.
New York is a magical place for photographers. For me it’s the energy of the place; the people; the mix of architecture.
We were walking south on 5th Avenue. A bright morning. The crowds pulling towards the Met and I wanted to capture that feeling. The image above is my second shot. A three second motion blur taken while walking. I guess you might call it a forward pan.
The back story is this. I usually shoot with a Nikon D4. It’s a great camera and my favourite for photo impressionistic experiments. But add a couple of lenses to your bag and after a while the weight is oppressive. A recent back injury forced me to consider other options so I thought I would try a compact system and bought a Nikon N1 J2. In picking the J2 price was a big factor. Nikon’s release of the updated J3 means there are plenty of deals on new cameras.
I was surprised at the image quality of the N1 J2. Even more surprising was the system’s versatility. It shoots Raw (NEF format) which can be a life saver. While it won’t shoot in camera multiple exposures; the shutter releases quickly allowing me to reproduce the effect in Photoshop. The camera gives you shutter and aperture control meaning long exposures are a possibility. Match the lens with a Cameron Fader ND filter using a step up adapter and you have some great creative choices. In my view this is a great alternative for my photo impressionism projects. My only complaint is the LCD can be a pain to use on a bright day. I like using a viewfinder.
For my taste, long exposures and in camera multiple multiple exposures are too soft and washed out. As a result I colour correct and add structure to my photo impressionistic images in Photoshop. In this case I have used NIK’s tonal contrast filter and the mid-tone conturing action from Vincent Versace.
Another experiment in my “in the round” series. The idea is to capture images all around the subject and then bring them together as a merged image in Photoshop to create more of a gestalt impression of the subject. The more I try this technique though, the more I find it is the deconstruction of the image that interests me; simplifying and reducing to produce a photo impressionistic sense.
For this example I followed the technique I have described in earlier posts. As with most multiple exposure images, the merged result is soft and there is a bit of a colour shift. For some this may be the impressionistic sense they are looking for but I like a bit more structure. In post production I almost always colour balance the image using the black point – white point technique, then using NIK’s filters I add a touch of contrast and then “fluff up” the pixels a bit using the mid tone contrast filter. Masking is important with these filters otherwise you will find there is no movement in the image. I always finish my images using Vincent Versace’s tonal contrast action which I control with a mask.
I really like the result here. A simple impression of a vase of tulips. The in the round approach and the random effect created by multiple images creates a painterly feel; a good example of photo Impressionism.
Spring brings some wonderful opportunities to explore “in the round photography”.
The idea is to capture the essence of an object in its environment by taking photographs from many points of view and then merging them into a single image. And the result is often a simplified version of the origin, bathed in muted soft pastel’s. I was first exposed to this idea in New York where you can find wonderful examples by Pep Ventosa at the Lumas gallery in Soho.
In this case I carefully walked in a circle around the apple tree taking a pictures every few paces. For each picture the tree was lined up in my view finder using the grid lines. Of course you can’t line your subject up perfectly but the process is very forgiving because the result is really an average of your efforts. In terms of numbers think 20 or more pictures.
Because the image is averaged there are other surprising results. While I was shooting a service truck parked in my point of view. It was obvious I was shooting so I was upset that the truck would create a distracting element in the background but as you can see it vanished when the images were blended together. Same thing with the “no parking” signs posted around the tree.
I start post processing in Lightroom where I select all the images I plan to use and then open them in Photoshop as layers. For this one I used an opacity blending script but the blending can also be achieved manually. For manual blending try reducing the opacity of each image by about 50% of the image before it.
I find the result of opacity blending a bit too soft so I use NIK’s tonal contrast filter and Vincent Versace’s mid tone contrast action.
Via Flickr:
Toronto International Dragon Boat Race – dragged shutter technique ( 1/3 seconds). www.dagostino.ca
Using a slow shutter is a fabulous way to capture movement and energy to create a photo impressionistic effect. Here are some ideas that I have found through experimentation:
Light is always going to be your concern when photographing subjects in motion. The photo impressionistic effect comes from the slow shutter speed. A good neutral density filter is a must. I really like variable neutral density filters because of their flexibility and have had some success with the Cameron Fader ND Filter.
Its all about experimentation. I have had some good results with dragon boats in the 1/3 to 1/2 sec range (even down to 0.7 sec on occasion) with my aperture close to f22. Try some test shots to get the balance right.
Panning is the critical skill here. I look for my point of visual interest (think picture in the picture) and try to keep it at a specific reference point in the view finder. You want that element to freeze in the image while all the other elements move creating a blur. It’s really hard to do even with a tripod or mono pod. The effect I was trying to achieve with the dragon boats was a sense of the circular motion of the paddles and the streaking background.
The shot below (0.7 secs at f18) was taken with a Kenyon Labs gyro. They are a really heavy addition to an already heavy kit but the results are great. As a result, the person who invented the wheel also deserves a camera credit here 🙂
The big technical challenge in producing photo impressionistic images as a montage (as opposed to an in camera multiple exposure) is working with large numbers of images and huge file sizes. Some of my recent experiments (Washington Square in the round for example) have used close to 40 images, resulting in file sizes over Apple’s 2 gig file limit.
Even in camera multiple exposures have issues. I find then to be inherently soft and, depending on the camera, suffer from from a red cast.
Here are a couple of tools I have found to be useful time savers:
Creating A Layer Stack In Photoshop
– Adobe Lightroom is my first choice to produce a layer stack in Photoshop because I already use it to manage my images. Select your images then right click for the menu choice.
– Dr Brown’s Stackomatic. A great script you launch from Adobe Bridge to create a layer stack.
Opacity Control
– Layer Stack Opacity Blending Script. A great script from Digital Outback Photography based on some thinking by Tony Sweet. The script calculates opacity and merges layers into a multiple exposure style image. There are no controls but the result is nice.
– Perfect Resize makes file sizing, in both directions, a snap. This is important for me because Adobe Lightroom is an important part of my workflow and it does not recognize files saved in large image format (.psb). Often my working files are much larger than Apple’s 2 gig file size limit.
Basic Digital Darkroom
In camera multiple exposures bring their own challenges. My fuji S2 adds a pronounced red shift which is significantly reduced in the S5. As well there is a softness associated with multiple exposures that may have to be addressed.
– Vincent Versace has produced some great actions (associated with his books and DVD courses) for correcting white/black point and mid tone contouring.
Via Flickr:
Watching Mona Lisa – Paris – in camera multiple exposure. This image, printed on stretched canvas, was exhibited at Toronto’s 2007 Contact Festival. See more at www.dagostino.ca/Contact/contact_index.html
First and foremost the goal of my website project is to promote the idea of photo impressionism as a genre in the hope that others will embrace it.
When I first started to create photo impressionistic images in the mid nineties there were only a few photographers exploring it on the web and fewer in print. Freeman Patterson’s book Photo Impressionism and the Subjective Image published in 2001 was a powerful resource and really changed the way I visualized photography ; really an extreme extension of the unbridled call for creativity in his 1999 book Photography for the Joy of It. Since then, and in no small part thanks to the digital revolution, photo impressionistic images have joined the main stream (if evidence is needed, look no farther than the plethora of multiple exposure and slow shutter images coming out of the Olympics.)
However, straight photography has been so prevalent for so long that photo impressionistic images still are not well received. Interestingly photographers seem most reluctant to embrace it. The comments appearing in dpreview.com’s coverage of Reuters’ Olympic multiple exposures illustrates point. It is shocking to see photographers loose site of the fact that every image is a”mere”representation of the event, not a true reproduction. Photo Impressionism is no different. Using photography as the medium it tries to capture the essence of a moment or thing and convey that essence to the viewer.
Here is a selection of photographers who seem to have embraced photo impressionistic techniques. I don’t mean for this list to be exclusive or exhaustive so by all means contact me if you would like to be included:
Pep Ventosa
Lovely photo impressionistic images “in the the round”:
http://www.pepventosa.com
Eva Polak
Lots of experimentation resulting in some great images. Check out her abstracts:
http://www.evapolak.com/
Dave Wodchris
Check out his use of slow shutter technique which produce some lovely abstracts:
Interesting hand coloured sx70 prints. I like the creative use of this old school technology to produce a photo impressionistic look:
http://www.sx70.com
Nikhil Bahl
Sun Flowers using slow shutter pan and zoom. Reminiscent of Van Gogh:
http://nikhilbahl.blogspot.ca/2010/07/photo-impressionism-zoom-flick.html
Flickr
There is a lot of great talent showcasing on Flickr. Check out the photo Impressionism groups:
I just started reading Vincent Vesace’s new book From Oz to Kansas: Almost Every Black and White Conversion Technique Known to Man. I am just a couple of chapters in but can see this book won’t disappoint. The book is written the same style as Welcome to Oz which was a bit of a watershed for me; lots of inspiration, lots of philosophy and great techniques which leave enough room for creativity.
I have used Vesace’s channel mixer for my infrared black and white conversions for a while now and am really looking forward to seeing how his technique and thinking has matured.
One bit of confusion in the Kindle version you need to be aware of. Even though the text in several locations directs you to the “Last Words” chapter for access to the on-line resources needed for the exercises, it isn’t there. Instead look in the index under the letter “O”. I expect this issue to be picked up quickly as the book has only been out for a week. The paperback should be out around the 20th of August. You can buy a copy on Amazon or through the author’s website.
Vincent Versace’s website can be found at http://www.versacephotography.com
There are two big challenges from my point of view. First the images have to be carefully composed to allow them to be merged. I try to keep a constant distance from the subject and use my view finder’s grid lines to keep the composition consistent. It all makes sense if you think of making an in camera multiple exposure. While you can fix composition issues in Photoshop, the result may look too contrived.
On the Photoshop side, the images depend on the use of opacity and blending modes. I have had good results using 50% of the opacity of the layer below as a rule of thumb. Different blending modes produce very different results. I like the look of luminosity mode.
Via Flickr:
Washington Square, New York. Another in a series of experiments in this genre. This image is composed of about 40 photographs taken around the fountain and then merged in photoshop. Post production was limited to colour balancing and filters designed to bring back a bit of structure such as NIK’s tonal contrast filter and Vincent Versace’s mid tone contrast action.
I have been experimenting with action sports such as dragon dragon boat racing and distance running using multiple exposure photography. So you can imagine my pleasure seeing some great examples coming out of the olympics.
These are some of the images I liked best:
For more images, credits and background information on the techniques used see:
Walking past the Lumas Gallery in Soho I was reminded that travel photography isn’t just about taking pictures. It is also an opportunity to see new ideas and techniques.
A few months ago I saw an exhibition of multiple exposure photographs shot “in the round” at Lumas. The photographer, Pep Ventosa, took photographs of trees from very angle and then merged them together to create a montage. The images, and in particular the trees, are beautiful, painterly and impressionistic. You get a sense of the tree, it’s environment, and more.
The technique is more difficult than it sounds. I use a DSLR that allows for in camera multiple exposures but the camera times out before you are finished and it doesn’t allow you to shoot enough images. I don’t think the technique works with fewer than 20. So you are forced to shoot single images and then merge them in Photoshop. I find that if you frame your shots as if the image in an in camera multiple exposure, the post processing won’t be as contrived because you maintain the sense of random error inherent in that kind of photography.
I have been experimenting with in-the-round using strong vertical subjects such as fountains, carousels and monuments. There is much to learn here but I think the Washington Monument example shows promise.
More to come on this technique as I figure out what works and what doesn’t.
The event is a real exercise in hurry up and wait. Races last just over 2 minutes but in reality you only have about 30 seconds of good shooting depending on your location. Then there is a pause while the next race sets up. Personally I couldn’t do it without my iPod and a selection of good pod casts.
I attended yesterday with the intention of working on my impressionist photography portfolio including dragged shutter and multiple exposure technique. I also thought I would try a little infra red black and white. All in all I was happy with my images. Here’s what I learned.
Shooting Location
The action takes place on the Long Pond at Centre Island. Races run from west to east.
You are much closer to the action if you perch on the south shore but be aware that at that location you are shooting into the sun.
Lenses
I brought a 70-200 and a 500 mm lens and a FX camera. My infrared camera is a DX. The 500 was marginally okay for shots looking directly down the course. The 70-200 was great for passing shots. If I had a 300 mm I would likely have used it.
Other Equipment
Wheels! It’s a long walk from the ferry so a wheeled camera bag is a great idea.
Tripod vs mono pod. I would bring both. The boats move quite quickly and there is a lot of action to choose from so I regretted not bringing a mono pod. The tripod of course is must at 500 mm as is a remote trigger.
Neutral density filters. You can’t slow down your shutter without them. I have been using a variable ND filter which I really like. The draw back being you can’t use a lens hood.
Food and water. There are lots of concession stands but the races run every 7 minutes on average so buying food will cost you 2-3 photo opportunities. I used a cooler bag and half frozen water bottles to keep it cold at a minimum weight.
Technique
To further my impressionist photography project I tried various shutter speeds and shutter intervals. It’s hard to tell at this point what worked and what didn’t but I will post my results as I see them. But on a preliminary basis it seemed to me that multiple exposures worked best at slower speeds eg 60th and dragged shuttled seemed best at about 1/2 a second.